On Premises
caution
This is internal documentation. This document can be used only if it was recommended by the Support Team.
Here you will find a recipe of manual actions how to set up k8s cluster for Deploy locally with help of an operator.
It will be described how to do it on minikube. If you use another tool, you might need to do it a bit differently.
If you already had installed minikube as docker based, first you might have to clean it up with:
minikube stop; minikube delete &&
docker stop $(docker ps -aq) &&
rm -rf ~/.kube ~/.minikube &&
sudo rm -rf /usr/local/bin/localkube /usr/local/bin/minikube &&
launchctl stop '*kubelet*.mount' &&
launchctl stop localkube.service &&
launchctl disable localkube.service &&
sudo rm -rf /etc/kubernetes/ &&
docker system prune -af --volumes
First of all you have to run minikube as VM.
Example:
minikube start --driver=virtualbox -p k120 --kubernetes-version=v1.20.0
We will need Ingress, so we have to install addons to enable it, as it doesn't come with a default setup:
minikube addons enable ingress -p k120
minikube addons enable ingress-dns -p k120
Next you have to define a resolvable hostname in /etc/hosts, for example like:
192.168.59.101 k120
where 192.168.59.101 you have to change with the result of minikube -p k120 ip
Then you can use k120 as a hostname for k8s cluster.
- Go through the process of scaffolding. After following these instructions, you'll get on your filesystem the next structure:
bnechyporenko@Bogdan-Nechyporenko xld % ls -al
total 472
drwxr-xr-x  10 bnechyporenko  staff     320 Nov  1 09:40 .
drwxr-xr-x   4 bnechyporenko  staff     128 Nov  3 13:43 ..
-rw-r--r--   1 bnechyporenko  staff     126 Nov  1 09:40 .gitignore
-rw-r--r--   1 bnechyporenko  staff     194 Nov  1 09:40 Dockerfile
-rw-r--r--   1 bnechyporenko  staff    7558 Nov  1 09:40 Makefile
-rw-------   1 bnechyporenko  staff     325 Nov  1 09:41 PROJECT
drwx------  10 bnechyporenko  staff     320 Nov  1 09:41 config
drwxr-xr-x   3 bnechyporenko  staff      96 Nov  1 09:41 helm-charts
-rw-r--r--   1 bnechyporenko  staff     198 Nov  1 09:41 watches.yaml
-rw-r--r--   1 bnechyporenko  staff  214732 Nov  1 09:36 xld.tgz
- Create some folder where you can copy and configure the setup. For example
xld-operator-setup. - Copy
configfolder toxld-operator-setup. You need only the next 11 files, the rest you can remove:
| Name | Path |
|---|---|
| cluster-role-digital-proxy-role.yaml | config/rbac/auth_proxy_role.yaml |
| cluster-role-manager-role.yaml | config/rbac/role.yaml |
| cluster-role-metrics-reader.yaml | config/rbac/auth_proxy_client_clusterrole.yaml |
| controller-manager-metrics-service.yaml | config/rbac/auth_proxy_service.yaml |
| custom-resource-definition.yaml | config/crd/bases/xld.my.domain_xldeployhelmcharts.yaml |
| deployment.yaml | config/default/manager_auth_proxy_patch.yaml |
| leader-election-role.yaml | config/rbac/leader_election_role.yaml |
| leader-election-rolebinding.yaml | config/rbac/leader_election_role_binding.yaml |
| manager-rolebinding.yaml | config/rbac/role_binding.yaml |
| proxy-rolebinding.yaml | config/rbac/auth_proxy_role_binding.yaml |
| daideploy_cr.yaml | config/samples/xld_v1alpha1_digitalaideploy.yaml |
That mapping has to be applied in applications.yaml file. There you can find 10 references to a file, which initially points to a template (paths needs to be relative). Example:
file: !file "kubernetes/template/manager-rolebinding.yaml"
- Next step is to configure locally Deploy. Make sure, that you have installed Kubernetes plugin.
- First we will manually create infrastructure CI in Deploy to make sure, that provided values are working against a local
cluster. I will describe how to do it for a
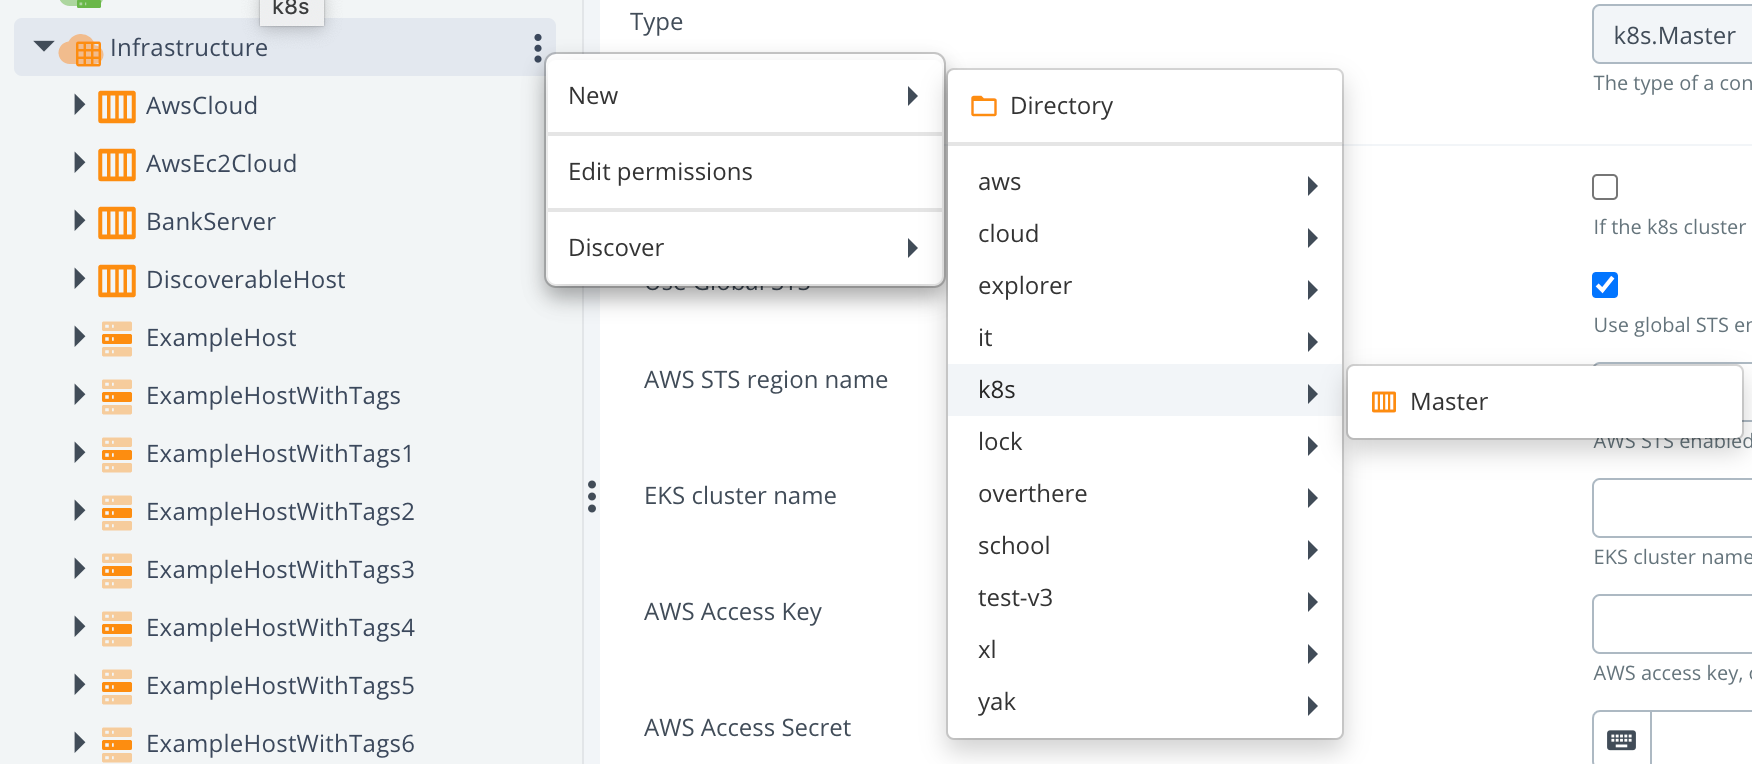
minikube, so if you are using something else, some technical details can be a bit different, but the idea is the same.- Start creating CI with type k8s.Master
- Fill in
API server URLfield: The command to get your server API:

- Next 3 fields are regarding the certifications. Therefore we have first to find the place where they are located. As
it depends on which profile is activated. Check it with a command
minikube profile. For example for me, the active profile isminikube, and my certificates are located at:
- Start creating CI with type k8s.Master
bnechyporenko@Bogdan-Nechyporenko minikube % ls -al ~/.minikube/profiles/minikube
total 88
drwxr-xr-x  12 bnechyporenko  staff   384 Nov  3 13:57 .
drwxr-xr-x   5 bnechyporenko  staff   160 Nov  1 09:41 ..
-rw-r--r--   1 bnechyporenko  staff  1399 Nov  1 09:42 apiserver.crt
-rw-r--r--   1 bnechyporenko  staff  1399 Nov  1 09:42 apiserver.crt.c7fa3a9e
-rw-------   1 bnechyporenko  staff  1679 Nov  1 09:42 apiserver.key
...
and one more in a home directory of minikube
bnechyporenko@Bogdan-Nechyporenko minikube % ls -al ~/.minikube
total 56
drwxr-xr-x  19 bnechyporenko  staff   608 Nov  3 13:57 .
drwxr-xr-x+ 85 bnechyporenko  staff  2720 Nov  4 10:19 ..
drwxr-xr-x   2 bnechyporenko  staff    64 Oct 25 15:54 addons
drwxr-xr-x   3 bnechyporenko  staff    96 Oct 27 10:12 bin
-rw-r--r--   1 bnechyporenko  staff  1111 Oct 25 15:56 ca.crt
-rw-------   1 bnechyporenko  staff  1679 Oct 25 15:56 ca.key
-rwxr-xr-x   1 bnechyporenko  staff  1099 Nov  3 13:57 ca.pem
...
Knowing all this information, we can fill in next fields:
| Field name | Path to the cert |
|---|---|
| caCert | ~/.minikube/ca.crt |
| tlsCert | ~/.minikube/profiles/minikube/apiserver.crt |
| tlsPrivateKey | ~/.minikube/profiles/minikube/apiserver.key |
tip
You have to provide in the field not a path, but a content.
Example: 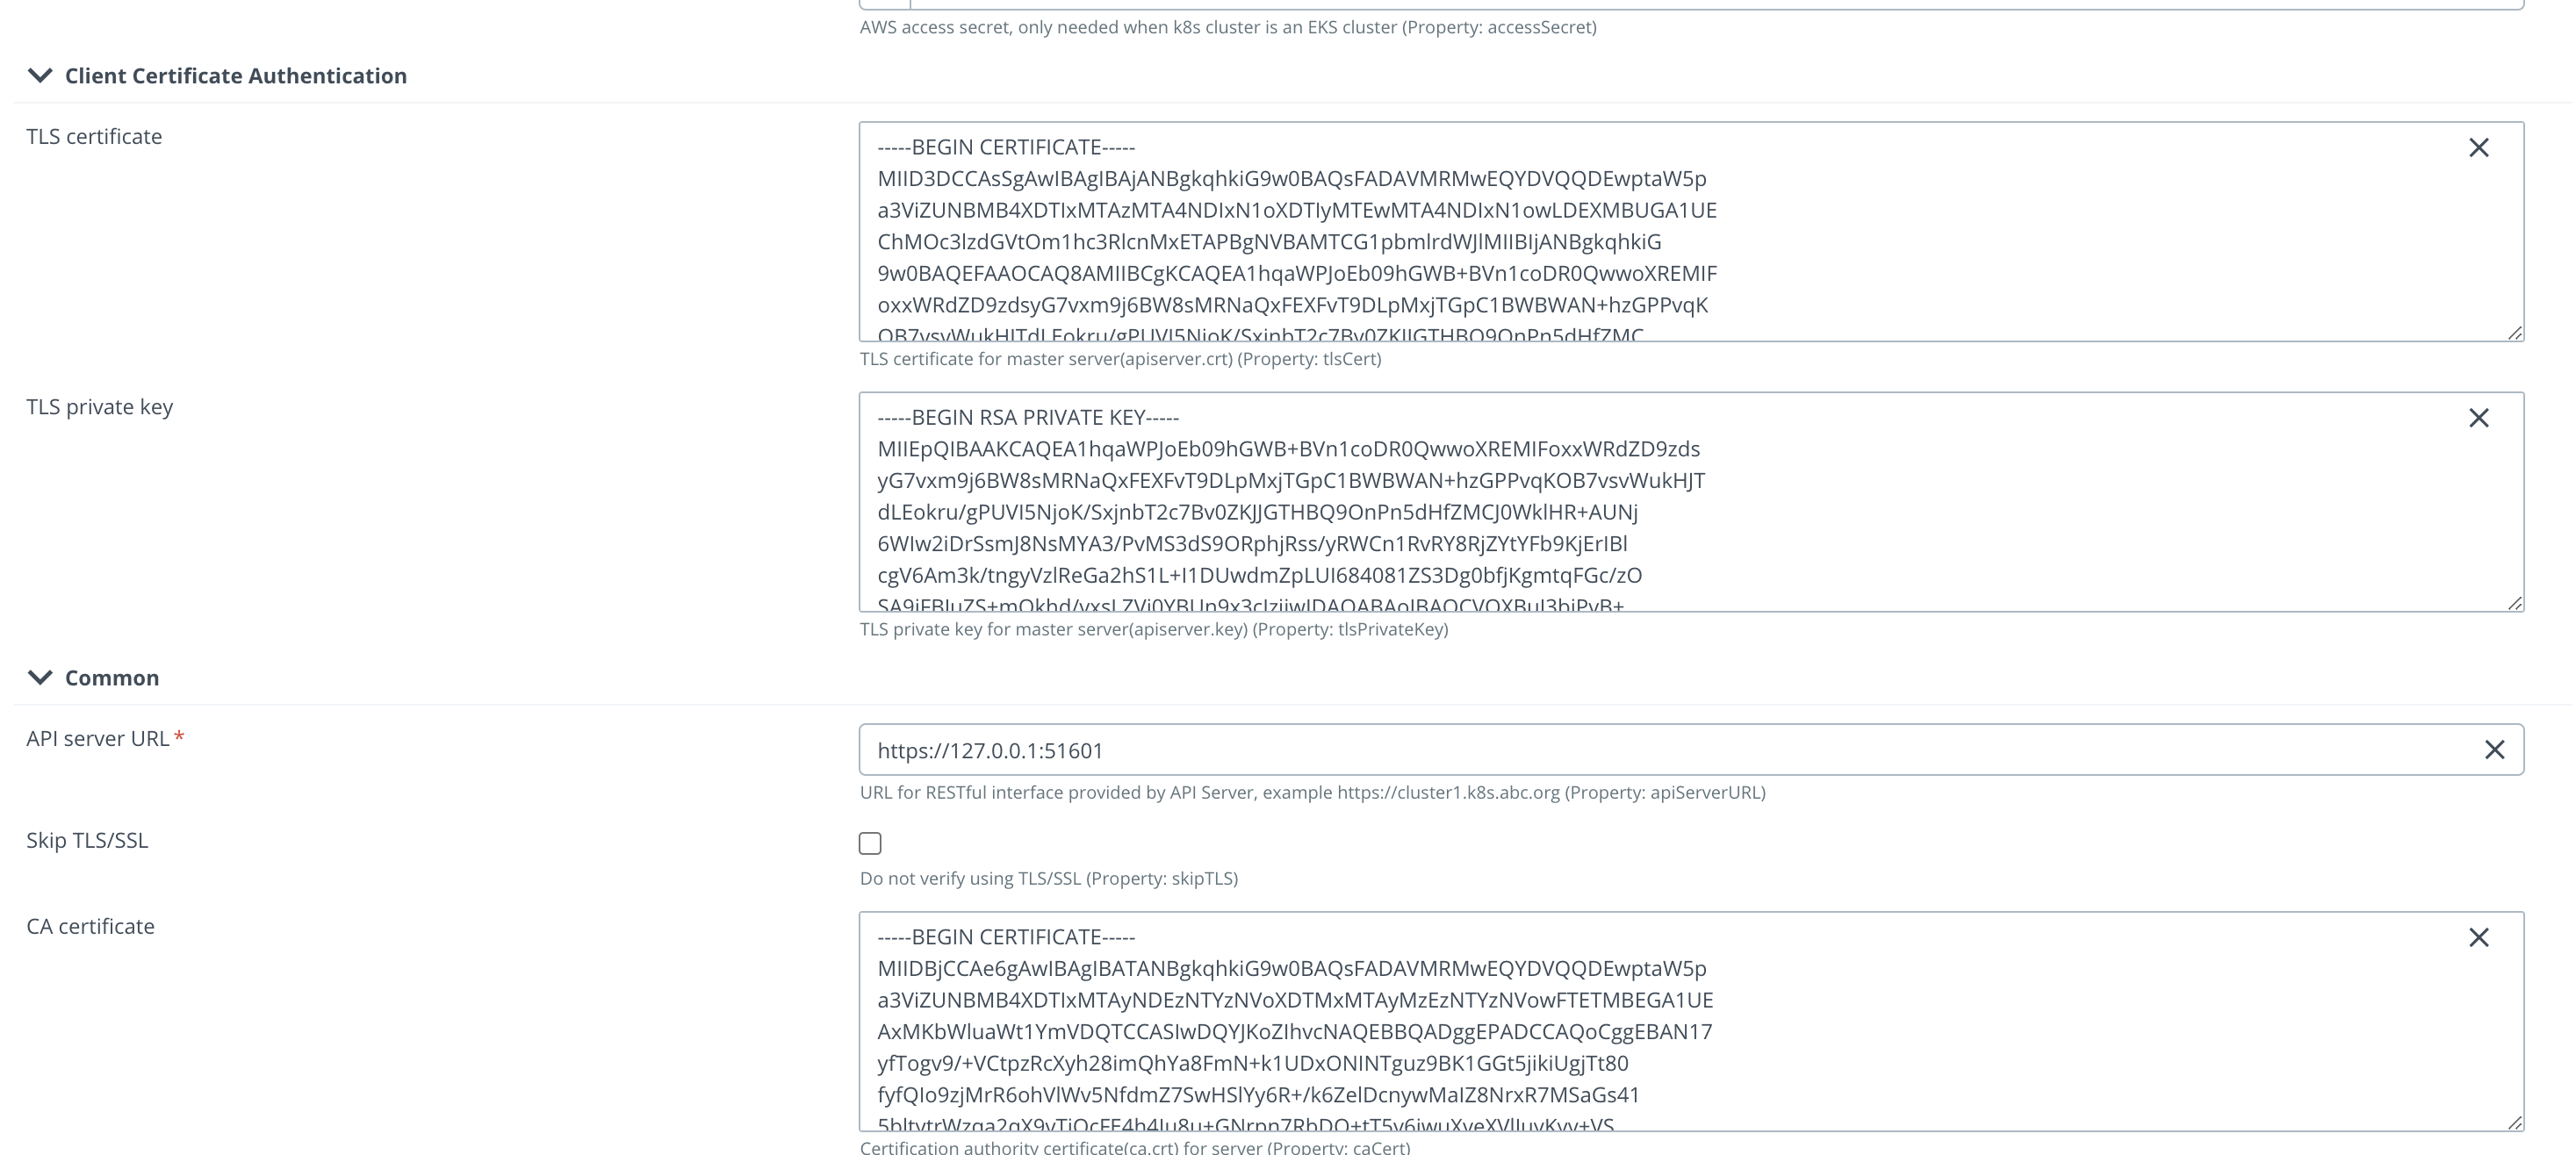
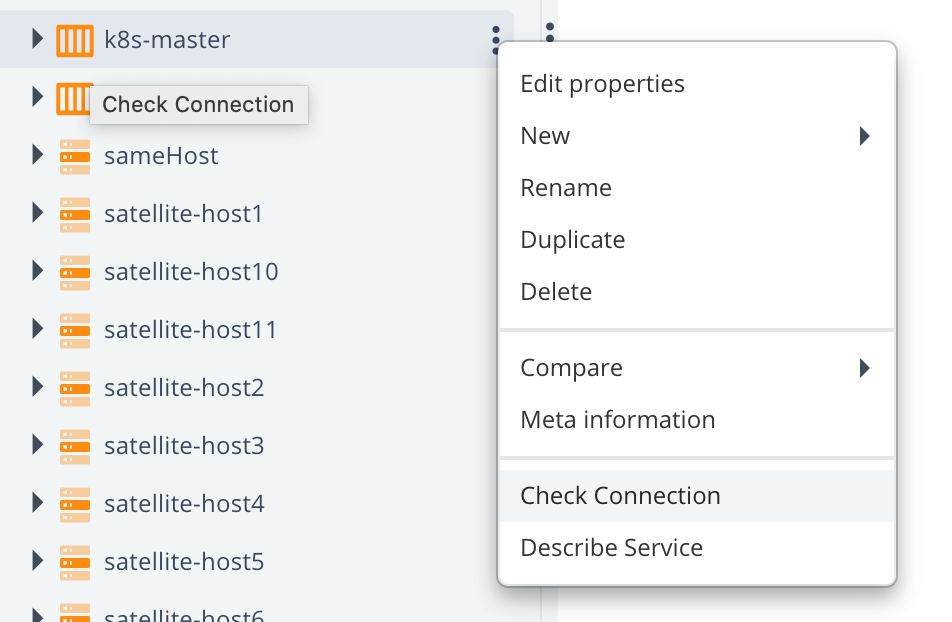
After that we have to verify if the provided configuration is correct, and we can connect to the cluster. For that
we will use a control task "Check Connection".
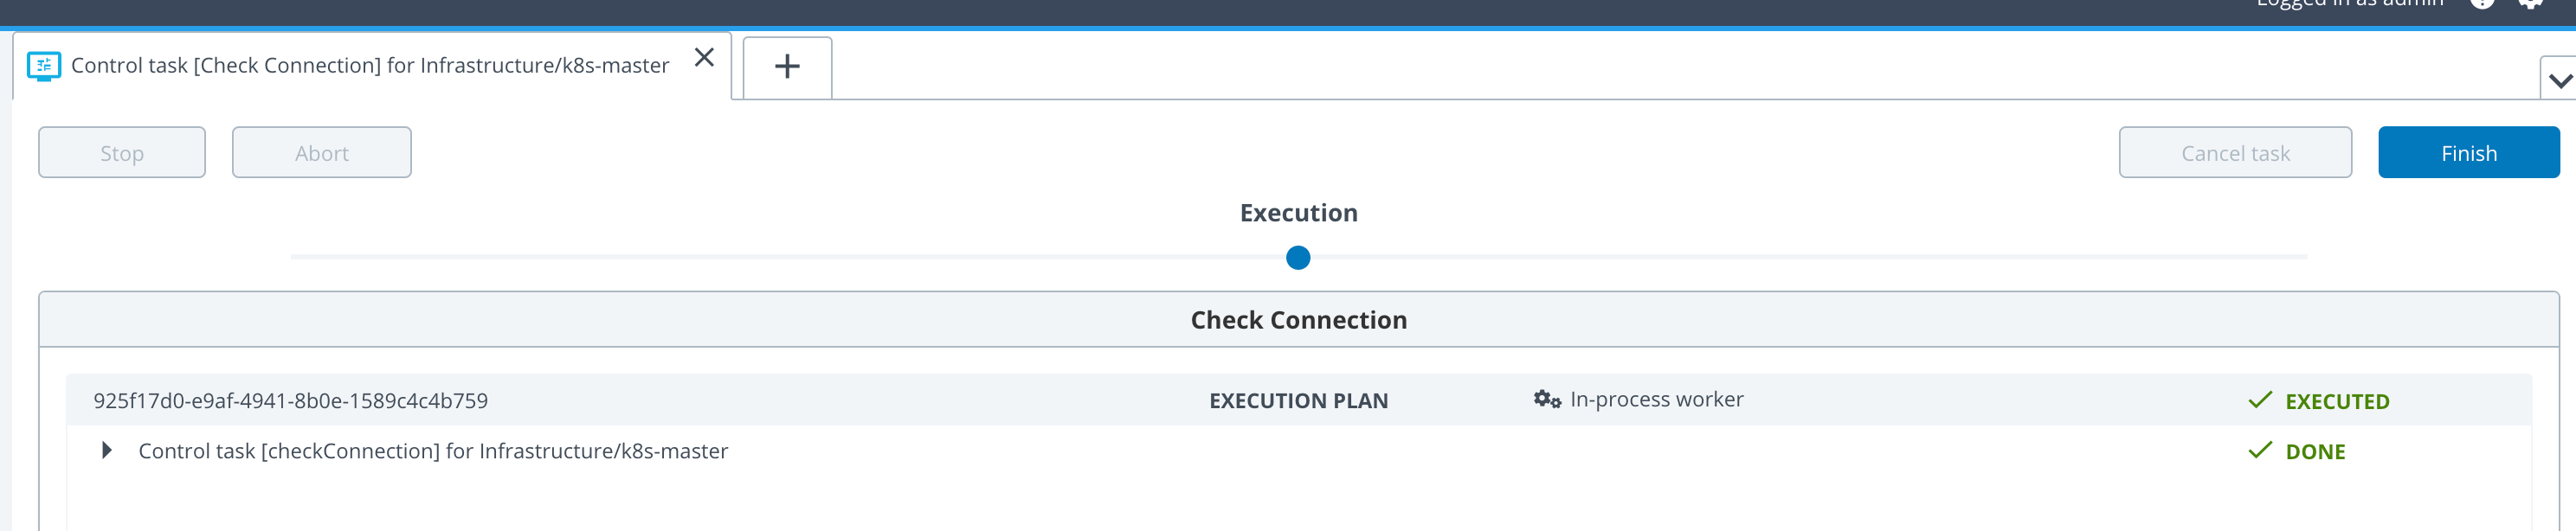
If everything configured correctly, you should see something like this:
After this success we are ready to fill in the next Yaml file
infrastructure.yamlFill in here these 4 fields:apiServerURL,caCert,tlsCertandtlsPrivateKey.Next step is to verify that no mistakes happened during copy-pasting to
infrastructure.yaml. For that we need to use As Code feature of Deploy to create CIs with help of XL CLI. Please check XL CLI how to install it. Runxl apply -f infrastructure.yamlby being in the same directory, or specify the full path to the file. In case you have non-default URL, you have to add this parameter:--xl-deploy-url YOUR_XL_DEPLOY_URLNext thing to tailor few parameters in
xld_v1alpha1_digitalaideploy.yaml. Copy it from scaffolding folder (you can find it inconfig/samplesfolder) to a root ofxld-operator-setupfolder.- Define or comment
KeystorePassphraseandRepositoryKeystore - Change StorageClass to what you have. For example, you can use 'standard', in case of using local file system. It depends how you configured it.
- Define your license in
xldLicensefield, by convertingdeployit-license.licfile's content to base64. - Define
RepositoryKeystoreaszs7OzgAAAAIAAAABAAAAAwAWZGVwbG95aXQtcGFzc3N3b3JkLWtleQAAAX0FGMZRrO0ABXNyADNjb20uc3VuLmNyeXB0by5wcm92aWRlci5TZWFsZWRPYmplY3RGb3JLZXlQcm90ZWN0b3LNV8pZ5zC7UwIAAHhyABlqYXZheC5jcnlwdG8uU2VhbGVkT2JqZWN0PjY9psO3VHACAARbAA1lbmNvZGVkUGFyYW1zdAACW0JbABBlbmNyeXB0ZWRDb250ZW50cQB+AAJMAAlwYXJhbXNBbGd0ABJMamF2YS9sYW5nL1N0cmluZztMAAdzZWFsQWxncQB+AAN4cHVyAAJbQqzzF/gGCFTgAgAAeHAAAAARMA8ECHAyz3pefALRAgMDDUB1cQB+AAUAAACQb6Y2JUQqkd5PtdwIAKEWNiVMcTnIS85U7FsvOb+b+xfOCV8+disezZCQ2f4F6YVGRO++u+NXd0YNDn/eXwge4w7i4ewNBydpMSTpVJieJA3nhh7mvUktatsAV+H7EcGYeMPx/cAlkqyFUHuiGz9p1ft3pxmxey2Uyt/FiBgAiV2hZAj14vGdSoRsMH8qN5ECdAAWUEJFV2l0aE1ENUFuZFRyaXBsZURFU3QAFlBCRVdpdGhNRDVBbmRUcmlwbGVERVO9rqwVmysM6czWLFdUj1+Xh1hxHQ==. (It's a working dummy example, you are free to use what you wish) - Define
KeystorePassphraseasdeployit. (It's a working dummy example, you are free to use what you wish) - Change namespaces in all yaml files to "default", instead of "system"
- Change for all
kind: ServiceAccountthe name todefault. - Replace the content of
manager_auth_proxy_patch.yamlto:
- Define or comment
apiVersion: apps/v1
kind: Deployment
metadata:
  labels:
    control-plane: controller-manager
  name: xld-operator-controller-manager
spec:
  replicas: 1
  selector:
    matchLabels:
      control-plane: controller-manager
  template:
    metadata:
      labels:
        control-plane: controller-manager
    spec:
      containers:
        - name: kube-rbac-proxy
          image: gcr.io/kubebuilder/kube-rbac-proxy:v0.8.0
          args:
            - "--secure-listen-address=0.0.0.0:8443"
            - "--upstream=http://127.0.0.1:8080/"
            - "--logtostderr=true"
            - "--v=10"
          ports:
            - containerPort: 8443
              name: https
        - name: manager
          args:
            - "--health-probe-bind-address=:8081"
            - "--metrics-bind-address=127.0.0.1:8080"
            - "--leader-elect"
            - "--leader-election-id=xld-operator-controller-manager"
          image: xebialabs/deploy-operator:1.2.0
          livenessProbe:
            httpGet:
              path: /readyz
              port: 8081
            initialDelaySeconds: 15
            periodSeconds: 20
          readinessProbe:
            httpGet:
              path: /healthz
              port: 8081
            initialDelaySeconds: 5
            periodSeconds: 10
          resources:
            limits:
              cpu: 100m
              memory: 90Mi
            requests:
              cpu: 100m
              memory: 60Mi
      terminationGracePeriodSeconds: 10
- Now you are ready to run the complete configuration with:
xl apply -v -f digital-ai.yaml
Troubleshooting
Scenario 1
Run kubectl get all returns only the Operator control manager pods which are deployed on the Kubernetes cluster. No other pods are deployed.
Then verify the operator control pod logs kubectl logs --follow pod/xld-operator-controller-manager-7ccc778f55-nfhl5 -c manger to identify the error in the cr file.
If the below error is observed, then remove enabled: true from podSecurityContext tag in xld_v1alpha1_digitalaideploy.yaml.

Scenario 2
- Step 1 Run
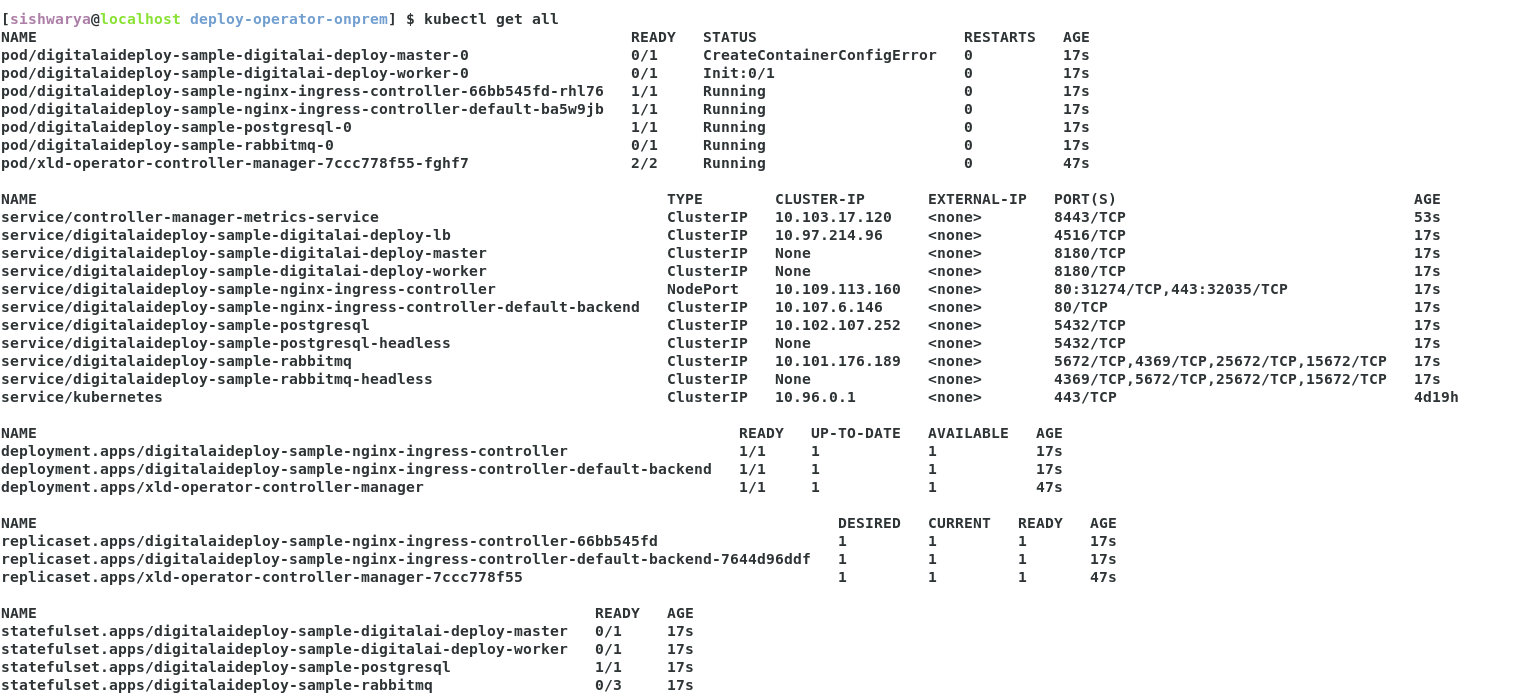
kubectl get allreturns the pods, when the below error is observed in master pod, execute step 2 below.
- Step 2 Run
kubectl describe pod/digitalaideploy-sample-digitalai-deploy-master-0command to identify the issue in container creation. When the below error is observed, then defineRepositoryKeystoreandKeystorePassphrasexld_v1alpha1_digitalaideploy.yaml.

Scenario 3
Run kubectl get all and if you see pod/digitalaideploy-sample-nginx-ingress-controller-default-bav88kd pod is failing again and again,
check the pod logs kubectl logs --follow pod/digitalaideploy-sample-nginx-ingress-controller-default-bav88kd for error,
and when the below error is observed, update the path to / for livenessProbe and readinessProbe of nginx-ingress-controller in xld_v1alpha1_digitalaideploy.yaml.

Scenario 4
- Run
kubectl get alland if your master and worker instance is not starting. - Change the
XldMasterPvcSize: 2GiandXldWorkerPvcSize: 2Giin xld_v1alpha1_digitalaideploy.yaml. - Verify number of cpus and memory allocated for kubernetes using below command, and if necessary increase the memory and cpus as part of minikube startup
minikube start --driver=docker --kubernetes-version=v1.20.0 -p k120 --cpus=4 --memory=15600MB
  [sishwarya@localhost deploy-operator-onprem] $ kubectl get node k120 -o jsonpath='{.status.capacity}'
        {"cpu":"8","ephemeral-storage":"51175Mi","hugepages-1Gi":"0","hugepages-2Mi":"0","memory":"32301572Ki","pods":"110"}
Uninstall
- Perform undeploy of operator in Deploy
- Remove manually all other CIs left in Deploy
- Clean PVCs manually
First you have to check what PVC were created
bnechyporenko@Bogdan-Nechyporenko k120 % kubectl get pvc
NAME                                         STATUS   VOLUME                                     CAPACITY   ACCESS MODES   STORAGECLASS   AGE
data-dai-xld-postgresql-0                    Bound    pvc-225272f8-f690-40fd-be5f-98d28c874e17   50Gi       RWO            standard       23m
data-dai-xld-rabbitmq-0                      Bound    pvc-b0580680-e119-41f9-961b-ab344170a654   8Gi        RWO            standard       23m
data-dir-dai-xld-digitalai-deploy-master-0   Bound    pvc-1bfb745b-b451-4103-881c-3e9995033203   10Gi       RWO            standard       23m
data-dir-dai-xld-digitalai-deploy-worker-0   Bound    pvc-a1ee162a-da5f-4eb9-8346-5ef3e006861f   10Gi       RWO            standard       23m
Afterwards, remove it like that:
bnechyporenko@Bogdan-Nechyporenko k120 % kubectl delete pvc data-dai-xld-postgresql-0 data-dai-xld-rabbitmq-0 data-dir-dai-xld-digitalai-deploy-master-0 data-dir-dai-xld-digitalai-deploy-worker-0