路 2 min read

Requirements#

Documentation is applicable for a version 10.4.0-1209.942 or later.

Pre-requisites#

Below are the prerequisites for the automation to run. You need to:

How the full flow works#

  • Installing a docker based Deploy instance, because we will use Deploy to create necessary resources in kubernetes and to deploy an operator.
  • Checking out Deploy operator and modifying the configuration based on the user input
  • Installing XL CLI to apply YAML files
  • Verifying that deployment was successful and all required resources were created in kubernetes. If something went wrong, you'll be notified about it in logs.

You can also check this operator AWS EKS documentation for more information.

All of this is automated and can be triggered by ./gradlew clean :core:startIntegrationServer --stacktrace with the configuration that is similar to the following example.

When you would like to stop your cluster you can run ./gradlew :core:shutdownIntegrationServer --stacktrace. It will undeploy all CIs, remove all deployed resources on kubernetes and clean all created PVC.

Example#

An example for a complete configuration:

deployIntegrationServer {    cli {        overlays = [                ext: [                        fileTree(dir: "$rootDir/config/cli", includes: ["**/*.py"])                ],                lib: [                        "com.xebialabs.xl-platform.test-utils:py-modules:${testUtilsVersion}@jar"                ]        ]    }    cluster {        enable = true        profile = 'operator'        publicPort = 10001    }    clusterProfiles {        operator {            activeProviderName = "aws-eks"                        awsEks {                        name = 'aws-eks-test-cluster'                        region = 'us-east-1'            }        }    }    servers {        server01 {            dockerImage = "xebialabsunsupported/xl-deploy"            pingRetrySleepTime = 10            pingTotalTries = 120            version = "${xlDeployTrialVersion}"            overlays = [                    conf: [                            fileTree(dir: "$rootDir/config/conf", includes: ["*.*"])                    ],            ]        }        server02 {        }    }    workers {        worker01 {            dockerImage = "xebialabsunsupported/deploy-task-engine"        }        worker02 {        }    }}

The cluster will be created with amount of servers and workers specified in the configuration. For this case, it will create 2 masters and 2 workers. The final URL to connect to UI is: http://deploy.digitalai-testing.com/xl-deploy/#/explorer. In case if you want to update the operator and use your own, you can change operatorImage.
路 3 min read

Requirements#

Documentation is applicable for a version 10.4.0-1209.942 or later.

Pre-requisites#

There are a couple of prerequisites which have to be performed in order to run the automation. You have to:

accountCredFile=...accountName=... 

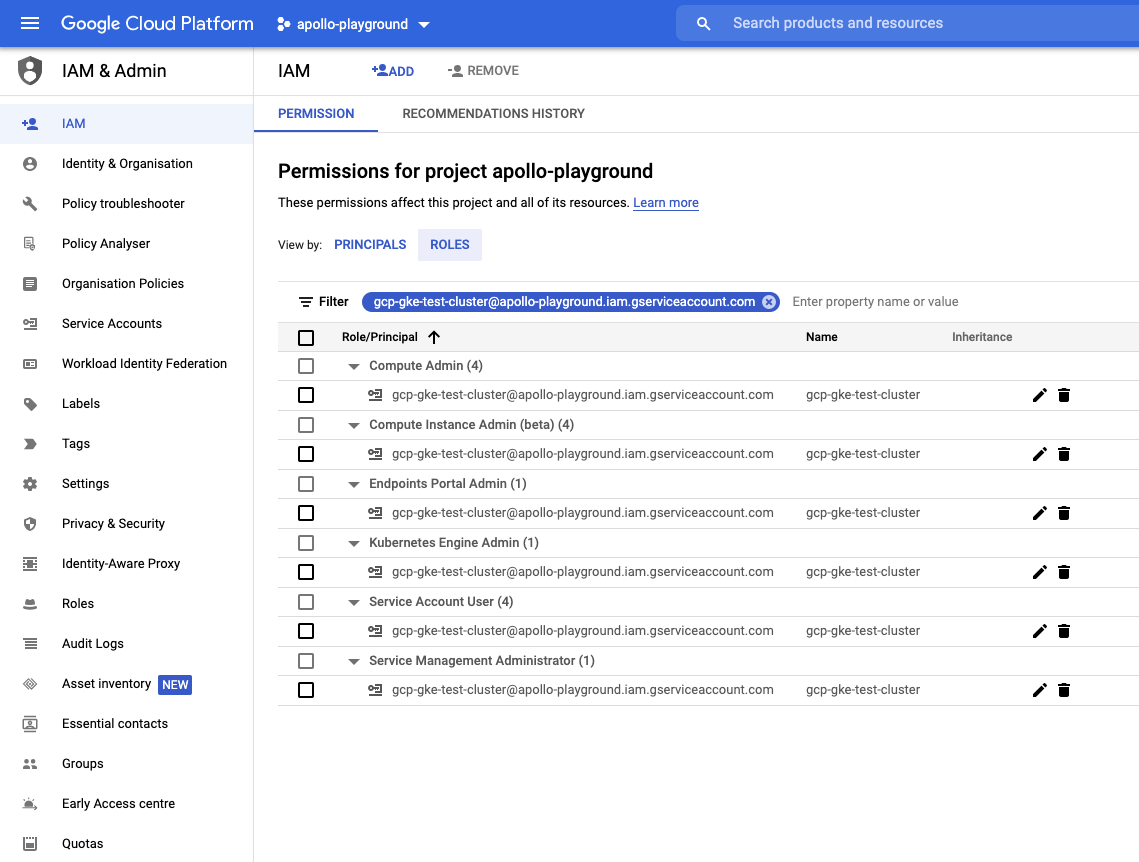
For the accountName the best is to use a service account. To create a service account and get JSON file that is needed for accountCredFile use the following link: Creating a service account. Assign to a service account following roles on the target project: IAM - Permissions for project for the service account More details about IAM policies for GKE are here: Create IAM policies
How the full flow works#

  • Installing a docker based Deploy instance, because we will use Deploy to create necessary resources in kubernetes and to deploy an operator.
  • Checking out Deploy operator and modifying the configuration based on the user input
  • Installing XL CLI to apply YAML files
  • Verifying that deployment was successful and all required resources were created in kubernetes. If something went wrong, you'll be notified about it in logs.

You can also check this operator GCP GKE documentation for more information.

All of this is automated and can be triggered by ./gradlew clean :core:startIntegrationServer --stacktrace with the configuration that is similar to the following example.

When you would like to stop your cluster you can run ./gradlew :core:shutdownIntegrationServer --stacktrace. It will undeploy all CIs, remove all deployed resources on kubernetes and clean all created PVC.

Example#

An example for a complete configuration:

deployIntegrationServer {    cli {        overlays = [                ext: [                        fileTree(dir: "$rootDir/config/cli", includes: ["**/*.py"])                ],                lib: [                        "com.xebialabs.xl-platform.test-utils:py-modules:${testUtilsVersion}@jar"                ]        ]    }    cluster {        enable = true        profile = 'operator'        publicPort = 10001    }    clusterProfiles {        operator {            activeProviderName = "gcp-gke"            gcpGke {                name = 'gcp-gke-test-cluster'                storageClass = 'standard-rwo'                accountName = 'gcp-gke-test-cluster@apollo-playground.iam.gserviceaccount.com'                projectName = 'apollo-playground'                regionZone = 'us-central1-a'                clusterNodeCount = 3                clusterNodeVmSize = 'e2-standard-2'            }        }    }    servers {        server01 {            dockerImage = "xebialabsunsupported/xl-deploy"            pingRetrySleepTime = 10            pingTotalTries = 120            version = "${xlDeployTrialVersion}"            overlays = [                    conf: [                            fileTree(dir: "$rootDir/config/conf", includes: ["*.*"])                    ],            ]        }        server02 {        }    }    workers {        worker01 {            dockerImage = "xebialabsunsupported/deploy-task-engine"        }        worker02 {        }    }}

The cluster will be created with amount of servers and workers specified in the configuration. For this case, it will create 2 masters and 2 workers. The final URL to connect to UI is: http://gcp-gke-test-cluster.endpoints.apollo-playground.cloud.goog/xl-deploy/#/explorer (composed of operator provider name and location). In case if you want to update the operator and use your own, you can change operatorImage. Cluster will create with 3 cluster nodes with cluster node-vm-size e2-standard-2 with 8GB and 4vCPU.
The geo zone of the cluster will be us-central1-a, check with gcloud compute zones list for other location. Storage class here will be used standard-rwo that is enabled with addon GcePersistentDiskCsiDriver during cluster creation. For details check Using the Compute Engine persistent disk CSI Driver.

路 2 min read

Requirements#

Documentation is applicable for a version 10.4.0-1209.942 or later.

Pre-requisites#

There are a couple of prerequisites which have to be performed in order to run the automation. You have to:

azUsername=...azPassword=... 

How the full flow works#

  • Installing a docker based Deploy instance, because we will use Deploy to create necessary resources in kubernetes and to deploy an operator.
  • Checking out Deploy operator and modifying the configuration based on the user input
  • Installing XL CLI to apply YAML files
  • Verifying that deployment was successful and all required resources were created in kubernetes. If something went wrong, you'll be notified about it in logs.

You can also check this operator Azure AKS documentation for more information.

All of this is automated and can be triggered by ./gradlew clean :core:startIntegrationServer --stacktrace with the configuration that is similar to the following example.

When you would like to stop your cluster you can run ./gradlew :core:shutdownIntegrationServer --stacktrace. It will undeploy all CIs, remove all deployed resources on kubernetes and clean all created PVC.

Example#

An example for a complete configuration:

deployIntegrationServer {    cli {        overlays = [                ext: [                        fileTree(dir: "$rootDir/config/cli", includes: ["**/*.py"])                ],                lib: [                        "com.xebialabs.xl-platform.test-utils:py-modules:${testUtilsVersion}@jar"                ]        ]    }    cluster {        enable = true        profile = 'operator'        publicPort = 10001    }    clusterProfiles {        operator {            activeProviderName = "azure-aks"            azureAks {                name = 'azure-aks-test-cluster'                clusterNodeCount = 3                clusterNodeVmSize = 'Standard_DS2_v2'                location = 'northcentralus'            }        }    }    servers {        server01 {            dockerImage = "xebialabsunsupported/xl-deploy"            pingRetrySleepTime = 10            pingTotalTries = 120            version = "${xlDeployTrialVersion}"            overlays = [                    conf: [                            fileTree(dir: "$rootDir/config/conf", includes: ["*.*"])                    ],            ]        }        server02 {        }    }    workers {        worker01 {            dockerImage = "xebialabsunsupported/deploy-task-engine"        }        worker02 {        }    }}

The cluster will be created with amount of servers and workers specified in the configuration. For this case, it will create 2 masters and 2 workers. The final URL to connect to UI is: http://azure-aks-test-cluster.northcentralus.cloudapp.azure.com/xl-deploy/#/explorer (composed of operator provider name and location). In case if you want to update the operator and use your own, you can change operatorImage. Cluster will create with 3 cluster nodes with default node-vm-size Standard_DS2_v2 with 7GiB and 2vCPU. The location of the cluster will be northcentralus, check with az account list-locations for other location.

路 3 min read

Requirements#

Documentation is applicable for a version 10.4.0-1209.942 or later.

Pre-requisites#

There are a couple of prerequisites which have to be performed in order to run the automation. You have to:

How the full flow works#

  • Installing a docker based Deploy instance, because we will use Deploy to create necessary resources in kubernetes and to deploy an operator.
  • Checking out Deploy operator and modifying the configuration based on the user input
  • Installing XL CLI to apply YAML files
  • Verifying that deployment was successful and all required resources were created in kubernetes. If something went wrong, you'll be notified about it in logs.

You can also check this documentation for more information.

All of this is automated and can be triggered by ./gradlew clean :core:startIntegrationServer --stacktrace with the configuration that is similar to the following example.

note

During cluster setup there will be info line, similar to the following: "Please enter your password if requested for user ${current_username} or give user sudoers permissions '${current_username} ALL=(ALL) NOPASSWD: ${path_to_script}/update_etc_hosts.sh'." where placeholders ${current_username} and ${path_to_script} will be replaced with correct values.

Update your /etc/sudoers file according to the info line that will be provided in the console log. If you didn't do that on time:

  • stop current build and rerun full installation after update of /etc/sudoers
  • or run following script: sudo "${path_to_script}/update_etc_hosts.sh"

When you would like to stop your cluster you can run ./gradlew :core:shutdownIntegrationServer --stacktrace. It will undeploy all CIs, remove all deployed resources on kubernetes and clean all created PVC.

Example#

An example for a complete configuration:

deployIntegrationServer {    cli {        overlays = [                ext: [                        fileTree(dir: "$rootDir/config/cli", includes: ["**/*.py"])                ],                lib: [                        "com.xebialabs.xl-platform.test-utils:py-modules:${testUtilsVersion}@jar"                ]        ]    }    cluster {        enable = true        profile = 'operator'        publicPort = 10001    }    clusterProfiles {        operator {            activeProviderName = "onprem"            onPremise {                name = 'onprem-test-cluster'                clusterNodeCpus = 4                clusterNodeMemory = 15000            }        }    }    servers {        server01 {            dockerImage = "xebialabsunsupported/xl-deploy"            pingRetrySleepTime = 10            pingTotalTries = 120            version = "${xlDeployTrialVersion}"            overlays = [                conf: [                    fileTree(dir: "$rootDir/config/conf", includes: ["*.*"])                ],            ]        }        server02 {        }    }    workers {        worker01 {            dockerImage = "xebialabsunsupported/deploy-task-engine"        }        worker02 {        }    }}

The cluster will be created with amount of servers and workers specified in the configuration. For this case, it will create 2 masters and 2 workers. The final URL to connect to UI is: http://onprem-test-cluster.digitalai-testing.com/xl-deploy/#/explorer. In case if you want to update the operator and use your own, you can change operatorImage. Cluster will use virtualbox with 4 CPUs and 15000MB memory.

路 2 min read

Requirements#

Documentation is applicable for a version 10.4.0-1209.942 or later.

Pre-requisites#

There are a couple of prerequisites which have to be performed in order to run the automation. You have to:

ocLogin=...ocPassword=... 

How the full flow works#

  • Installing a docker based Deploy instance, because we will use Deploy to create necessary resources in kubernetes and to deploy an operator.
  • Checking out Deploy operator and modifying the configuration based on the user input
  • Installing XL CLI to apply YAML files
  • Verifying that deployment was successful and all required resources were created in kubernetes. If something went wrong, you'll be notified about it in logs.

You can also check this documentation for more information.

All of this is automated and can be triggered by ./gradlew clean :core:startIntegrationServer --stacktrace with the configuration that is similar to the following example.

When you would like to stop your cluster you can run ./gradlew :core:shutdownIntegrationServer --stacktrace. It will undeploy all CIs, remove all deployed resources on kubernetes and clean all created PVC.

Example#

An example for a complete configuration:

deployIntegrationServer {    cli {        overlays = [                ext: [                        fileTree(dir: "$rootDir/config/cli", includes: ["**/*.py"])                ],                lib: [                        "com.xebialabs.xl-platform.test-utils:py-modules:${testUtilsVersion}@jar"                ]        ]    }    cluster {        enable = true        profile = 'operator'        publicPort = 10001    }    clusterProfiles {        operator {            activeProviderName = "aws-openshift"            awsOpenshift {                apiServerURL = 'https://api.yourhost.lnfl.p1.openshiftapps.com:6443'                host = 'router-default.apps.yourhost.lnfl.p1.openshiftapps.com'                name = 'aws-openshift-test-cluster'                oauthHostName = "oauth-openshift.apps.yourhost.lnfl.p1.openshiftapps.com"                operatorImage = 'acierto/deploy-operator:1.0.6-openshift'                operatorPackageVersion = "1.0.1"            }        }    }    servers {        server01 {            dockerImage = "xebialabsunsupported/xl-deploy"            pingRetrySleepTime = 10            pingTotalTries = 120            version = "${xlDeployTrialVersion}"        }        server02 {
        }    }    workers {        worker01 {            dockerImage = "xebialabsunsupported/deploy-task-engine"        }        worker02 {        }    }}

The cluster will be created with amount of servers and workers specified in the configuration. For this case, it will create 2 masters and 2 workers. The final URL to connect to UI is: router-default.apps.yourhost.lnfl.p1.openshiftapps.com. In case if you want to update the operator and use your own, you can change operatorImage. As you can see from this example, that's exactly what happened. acierto/deploy-operator:1.0.6-openshift is not the official operator. Information about apiServerURL, host and oauthHostName you should check in your OpenShift Cluster console.

路 2 min read

Introduction#

Create your Kube scanning test, for your custom plugin in against running kubernetes cluster. Here we are using the Kube-bench tool that checks the Kubernetes cluster is deployed securely by running the necessary checks documented in the CIS Kubernetes Benchmark.

Build gradle configuration for kube scanner#

deployIntegrationServer {    kubeScanner {        awsRegion = 'eu-west-1'         logOutput = true        kubeBenchTagVersion = "v0.6.5"        command = ["-v", "3", "logtostrerr"]    } }
NameTypeDefault ValueDescription
awsRegionOptionalBy default it will read from config [~/.aws/config] file.
logOutputOptionalfalseTo Log the command and output executed while running the test.
kubeBenchTagVersionOptionallatestBy default it will use the latest main branch.
commandOptional["kube-bench", "run", "--targets", "node","--benchmark", "eks-1.0"]List of command for running the test.

Under the hood#

Great, we now have the setup done. Let's figure out how it works.

How to scan the kubernetes cluster which is running on AWS (EKS)?#

  • By Running the below command, we can scan the Kubernetes cluster which is configured as current-context in ~/.kube/config.
./gradlew clean kubeScanning
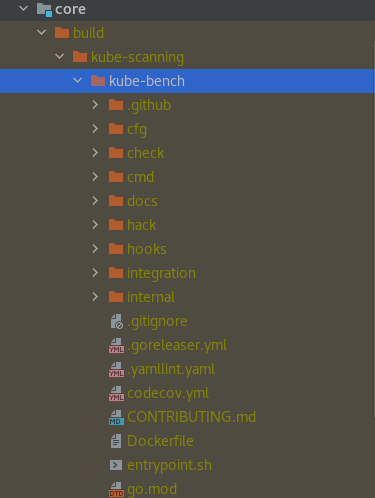
  • Firstly, it will clone the kube-bench repo with a tag to build/kube-scanning/kube-bench folder. As in the below illustration:

kube-bench-repo

  • Next, execute the steps for AWS-EKS-Cluster
    • Create the repository in AWS ECR
    • Take docker build of kube-bench with tag
    • Push the created image to AWS ECR
    • Update the job-eks.yaml with the latest image which we generate in a previous step and run the job.

kube-bench-aws-eks-command

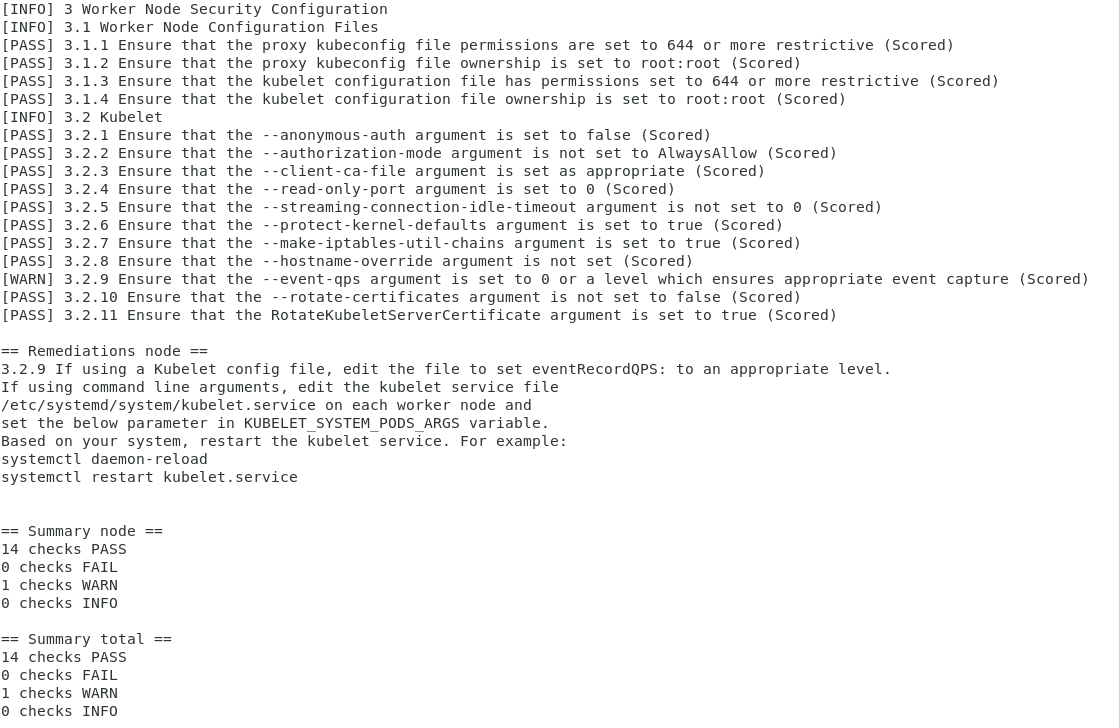
  • Once the above command execution is completed, we can find the report in build/kube-scanning/report folder, like the below sample log.

    kube-bench-aws-eks-report

info

note

路 5 min read

Requirements#

Documentation is applicable for a version 10.3.0-902.1243 or later.

The version of the plugin contains not random values, but you can read it next way 10.3.0 means that it works for Deploy 10.3.0

After the dash is the information about the time when it was released:
902 - 2nd of September
1020 - 10:20 AM

Introduction#

I expect that you are the beginner of using this plugin, and your intention is to create your first integration test for your custom plugin in against running Deploy instance.

At this moment you can run only Jython based tests which are executed via CLI.

integrationServer {    clis {        cli {            version = "10.3.0-902.1430"        }    }    servers {        controlPlane {            dockerImage = "xebialabs/xl-deploy"            version = "10.2.2"        }    }    tests {        testScenario01 {            baseDirectory = file("src/test/jython/scenarios")            extraClassPath = [file("src/test/jython/py-classpath")]            tearDownScripts = ['teardown.py']        }    }}

In CLI section we specify the version which is available publicly. It can mismatch with Deploy server. Most of the time it is backward compatible. Specially for the usage of it inside of integration server CLI was changed, therefore you can't use CLI with a lower version than 10.3.0-902.1430.

Test section explanation#

In tests section, you can create multiple test sections. At this blog we will take a look at the simplest configuration required. First of all, you have to define where are your all tests resides, what is the base directory of it.

baseDirectory = file("src/test/jython/scenarios")

This is exactly what we do here. Then you can create sub-folders and keep each scenario in own folder.

CLI is a java process which has own classpath and can contain inside the python modules so that you can have access to them from your tests. Quite useful to keep there the shared utils. For example, it can be assertion tools or variables (like in teardown script to know what to scrape out). For that you can add extra folders to a default classpath strategy of CLI by

extraClassPath = [file("src/test/jython/py-classpath")]
info

Default strategy to compose a classpath for CLI can be found in cli.(sh|cmd) script. Namely, these lines (for *.sh):

for each in `ls hotfix/*.jar lib/*.jar plugins/*.jar 2>/dev/null`do  if [ -f $each ]; then    DEPLOYIT_CLI_CLASSPATH=${DEPLOYIT_CLI_CLASSPATH}:${each}  fidone

So it means that you can also leverage from creating your own python module, archive it as jar and use overlays to place it in CLI as a plugin or a lib. You can take it as an alternative whenever you have to reuse same logic across multiple repositories.

When test has finished, successfully or not, it is a good practice to clean up everything what test created. This configuration is exactly for this purpose:

tearDownScripts = ['teardown.py']

Full set of options for this section you can find here: https://xebialabs.github.io/integration-server-gradle-plugin/docs/getting-started/configuration#tests-section

For a full version of this configuration file (and the project), have look at an example: https://github.com/acierto/xld-simple-itest

Under the hood#

Great, we set it up. Let's figure out how it works.

Downloading flow#

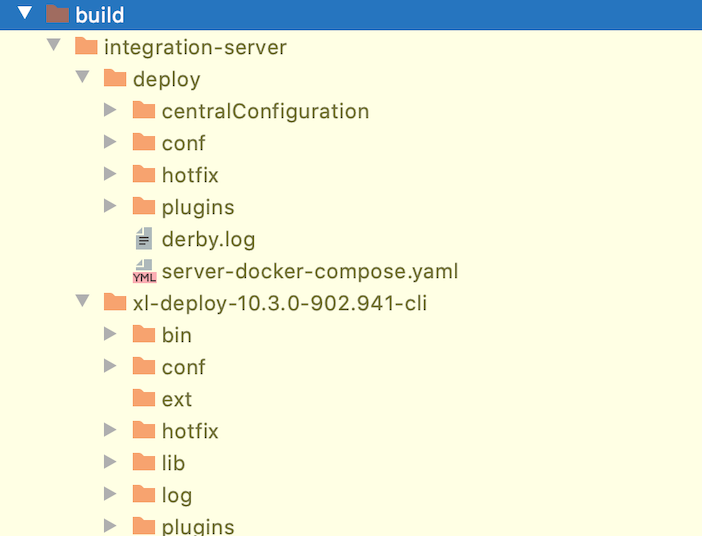
We download a server and CLI to a build folder. As you can see it on the picture:

cli-and-server

As we didn't apply any modification sections as overlays, copyBuildArtifacts, etc. the structure and content there would be same as from Nexus/Docker image.

Test execution and troubleshooting#

Test runner is looking at the configurations, searching for a base folder to scan there files and then creates a sequence of them to execute. As we have only 1 test and 1 teardown script we will see as a source for CLI 2 tests. I'll refer to the available logs produced by GitHub Actions https://github.com/acierto/xld-simple-itest/runs/3495662609.

There we can find the next log snippet: Log snippet

What is interesting to see here for us:

  • To pay attention to that we connect to a non-default port -port 43735. In a server section we didn't specify the fixed port, so we are running it on a random. It's very important if you want to run several tests in parallel and to not clash by using the same port. CLI picks that information by reading in the file conf/deployit.conf a property value for a key http.port.

  • As we didn't define a socket port, it is running with a timeout of 1 minute: -socketTimeout 60000. If you'll have some long-running scripts which will take longer than that, this is a place to tune it.

  • As order of Python test execution matters, you can check it out in an option -source. In this example we can see the next:

-source /home/runner/work/xld-simple-itest/xld-simple-itest/src/test/jython/scenarios/create-ci.py,/home/runner/work/xld-simple-itest/xld-simple-itest/src/test/jython/scenarios/teardown.py
  • All the logs related to a CLI execution will be saved in <CLI_HOME>/log and exact location for this log is also specified, for a convenience of troubleshooting: /home/runner/work/xld-simple-itest/xld-simple-itest/build/integration-server/xl-deploy-10.3.0-902.941-cli/log/test-0e873cfc.log. After each re-run we remove old logs to not be buried under multiple versions of it. Be aware to copy it to another location if you'd like to preserve it.